Configure your API proxy
This guide explains how to create a basic API proxy configuration, including:
- Setting up the proxy base URL as a target server variable.
- Adding a shared flow to verify API keys.
- Creating different conditional flows.
- Adding a policy to catch invalid requests.
- Adding a policy to ensure that each request contains CORS headers.
Access the develop tab
-
From the proxy Overview tab, go to Develop.
Set up the base URL
You will set up the base URL as a target server variable to prevent copy-and-paste errors when creating multiple proxies for the same API.
-
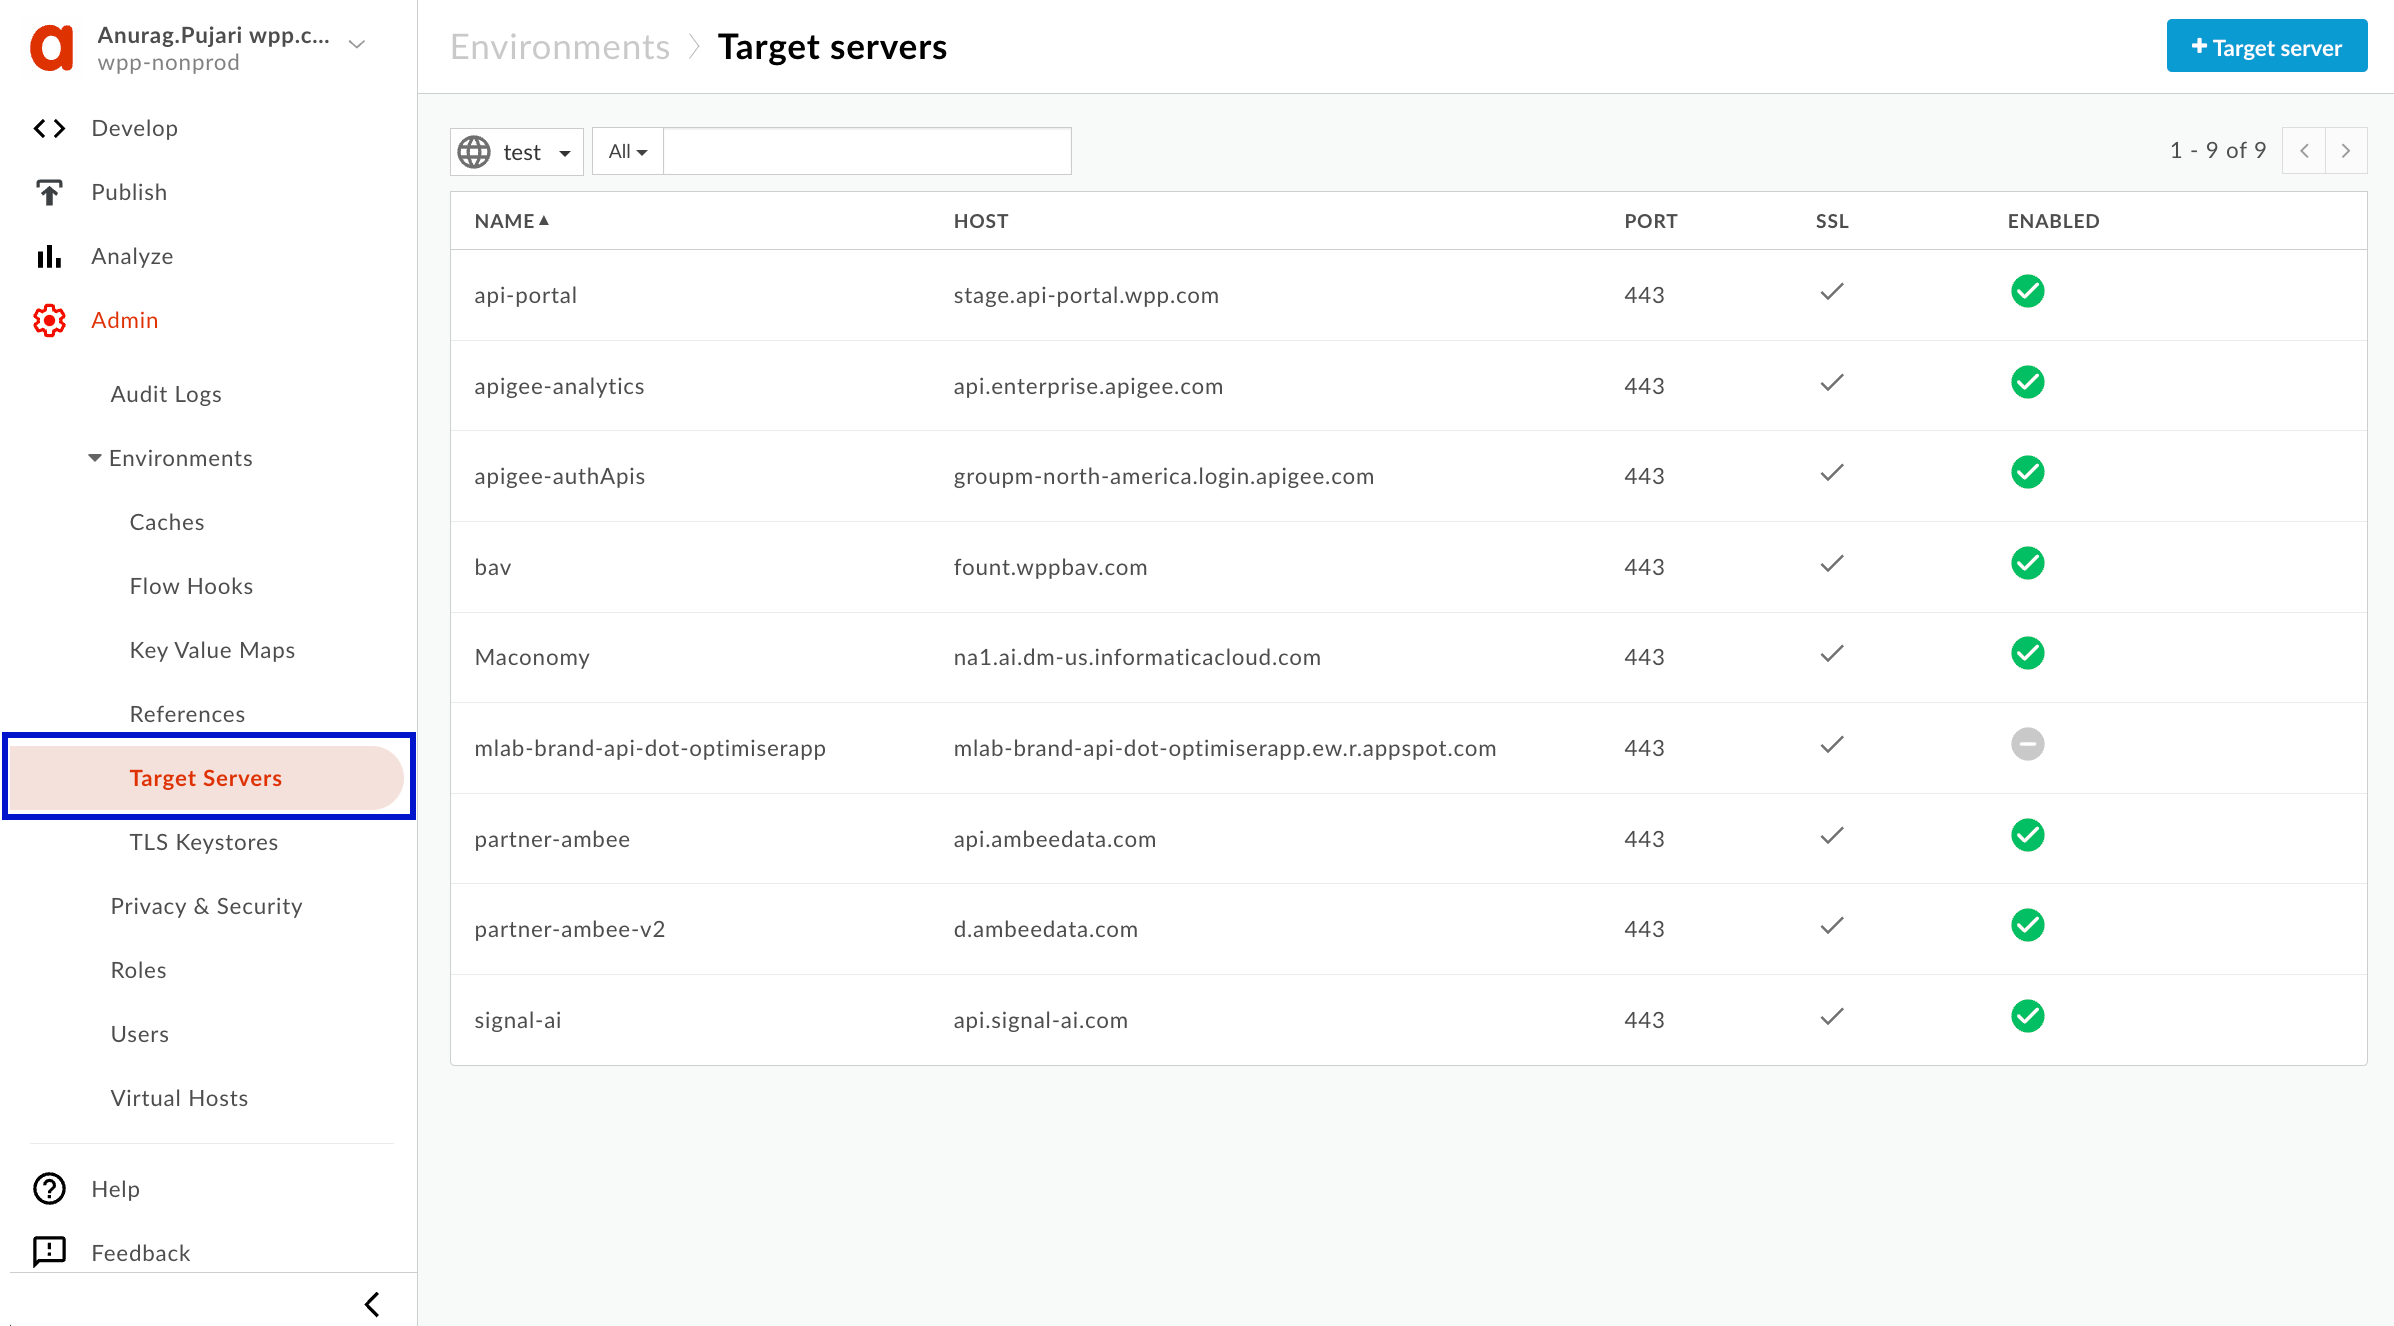
In the Apigee sidebar, go to Admin > Environments > Target Servers.
-
In the upper-right corner, select + Target server and fill out the necessary information as in the following example. Make sure to select Enabled. For the port, use 443 or choose the one that works best for your use case.

-
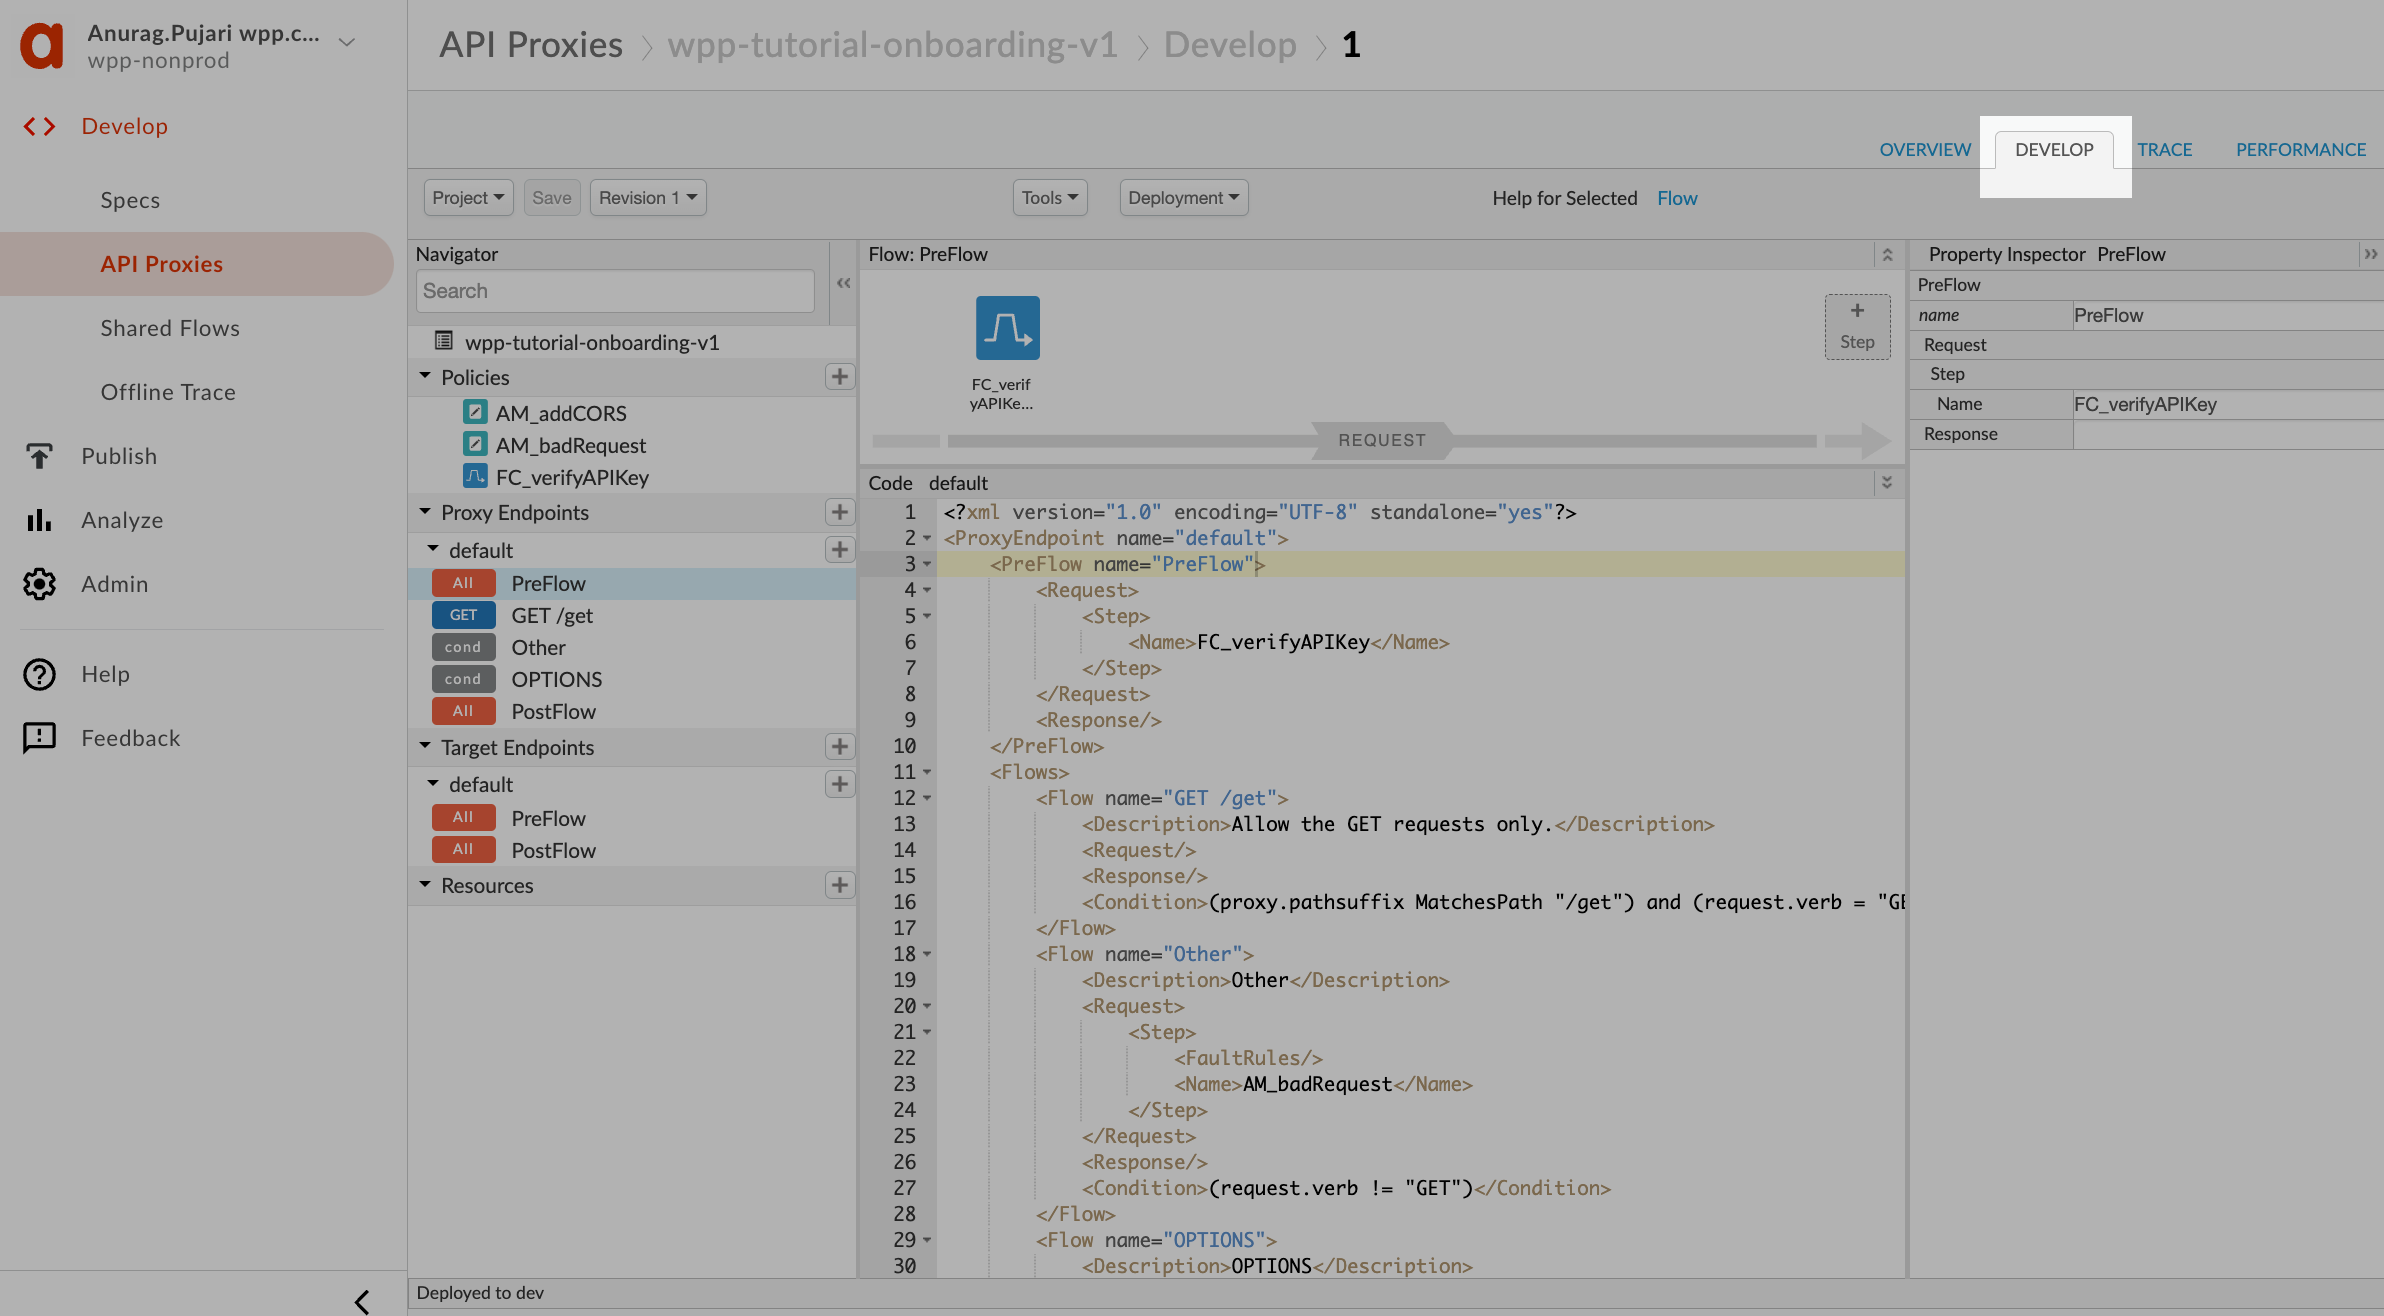
Back in the proxy code editor, under PreFlow, replace the default
HTTPTargetConnectionwith the following:<HTTPTargetConnection>
<LoadBalancer>
<MaxFailures>0</MaxFailures>
<RetryEnabled>true</RetryEnabled>
<!--Change the server name to the one you've created-->
<Server name="wpp-tutorial">
<IsEnabled>true</IsEnabled>
<IsFallback>false</IsFallback>
<Weight>1</Weight>
</Server>
<TargetDisableSecs>300</TargetDisableSecs>
</LoadBalancer>
<!--Change to reflect the necessary path value-->
<Path>/get</Path>
<Properties/>
</HTTPTargetConnection> -
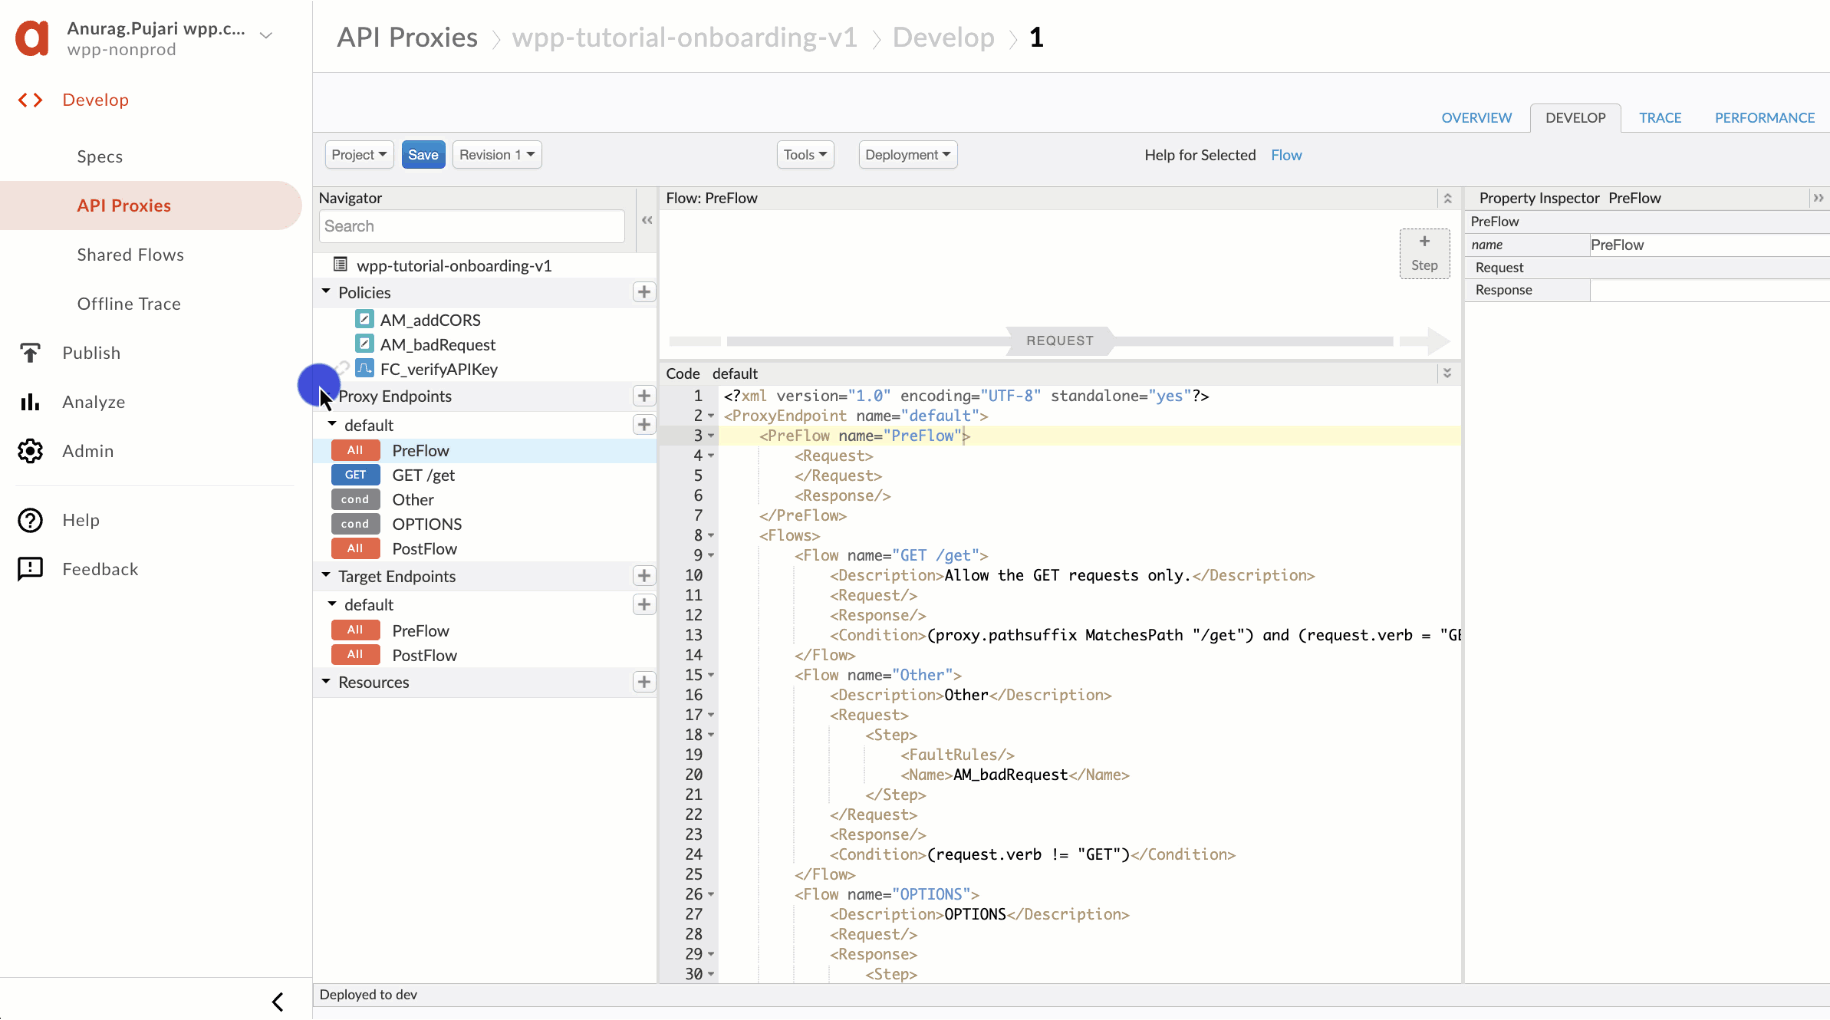
Your proxy should look as follows when you've completed the steps.

Add a shared flow to verify API keys
You will use one of the API First shared flows to verify the validity of API keys.
-
Next to Policies, select the plus icon, then scroll through the available policies, and, under Extension, select Flow Callout.

-
Fill out the necessary info and select Add.
Specify the policy name in the format
{Abbreviated-Policy-Type}_{Purpose of the policy}(in our case, it's FC_verifyAPIKey). Under Shared Flow, select Shared_preFlow-clientCredentials-v1.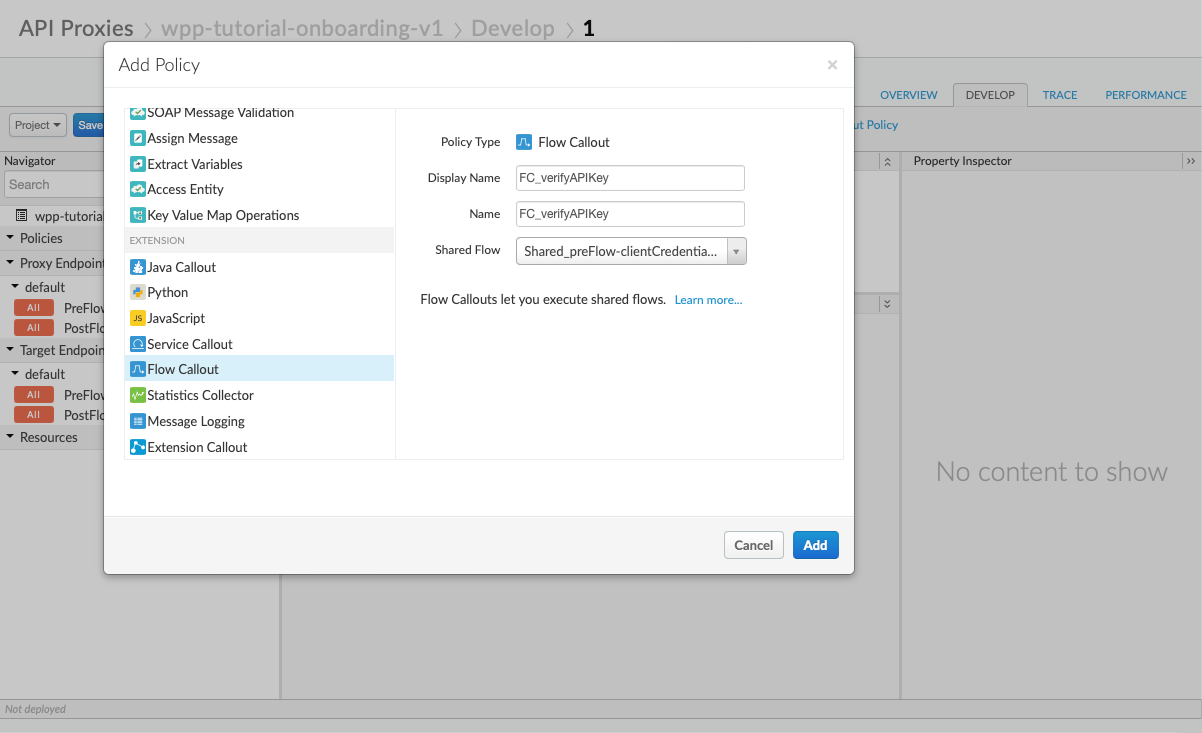
-
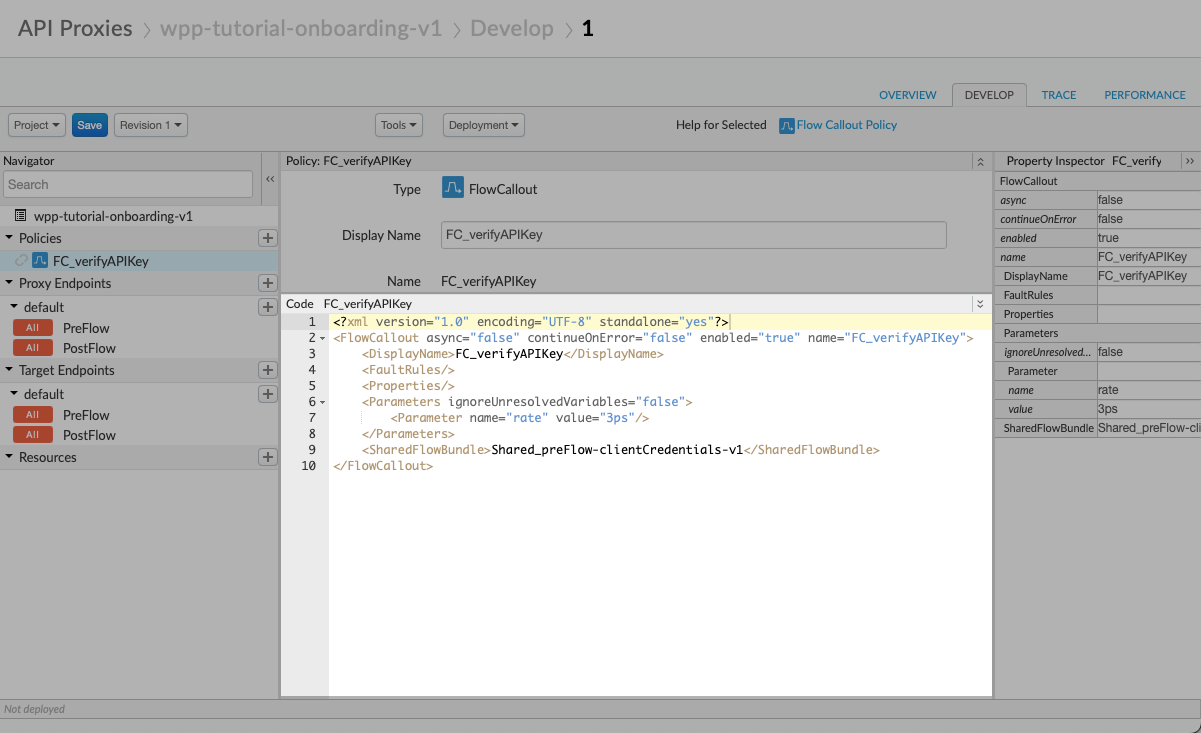
In the FC_verifyAPIKey code editor, substitute the default code with the following.
<?xml version="1.0" encoding="UTF-8" standalone="yes"?>
<FlowCallout async="false" continueOnError="false" enabled="true" name="FC_verifyAPIKey">
 <DisplayName>FC_verifyAPIKey</DisplayName>
 <FaultRules/>
 <Properties/>
 <Parameters ignoreUnresolvedVariables="false">
     <!--Update the rate value to fit your needs-->
     <Parameter name="rate" value="3ps"/>
 </Parameters>
 <SharedFlowBundle>Shared_preFlow-clientCredentials-v1</SharedFlowBundle>
</FlowCallout>
This code calls the shared flow and sets a rate for the spike arrest policy to limit the number of API calls to three calls per second. Update the rate value to fit your needs.
In the upper-left corner of the proxy editor, select Save.
-
Drag and drop the newly created FC_verifyAPIKey to your proxy's PreFlow. Ensure that this policy is at least the second one in the order.
Add different conditional flows
Adding different conditional flows is optional and allows you to customize your API proxy further. You can refer to the Google Apigee docs for more information on conditional flows.
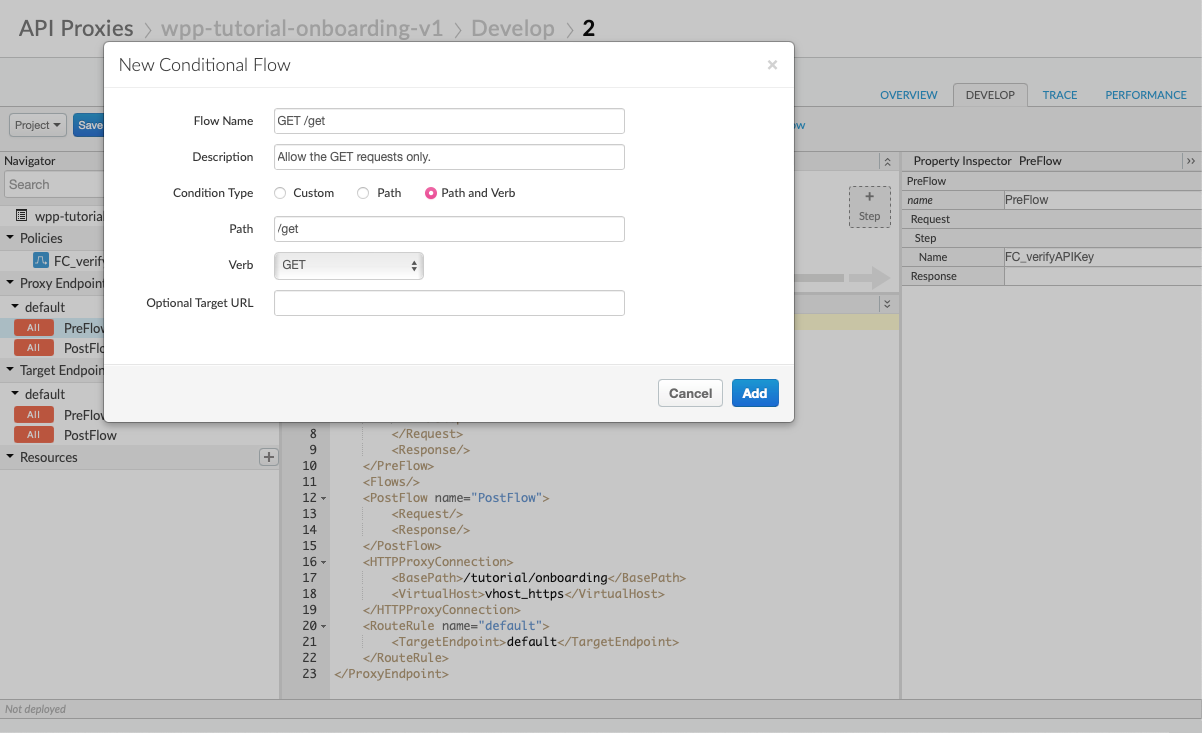
You will create a conditional flow ensuring that your proxy only allows GET requests.
-
Under Proxy Endpoints, next to default, select the plus icon.
-
Use the following parameters and select Add.
Create a policy for invalid requests
You will create a policy to catch invalid API requests and implement a conditional flow to enforce it. When users try to make a request other than GET, the proxy will return an appropriate error message.
-
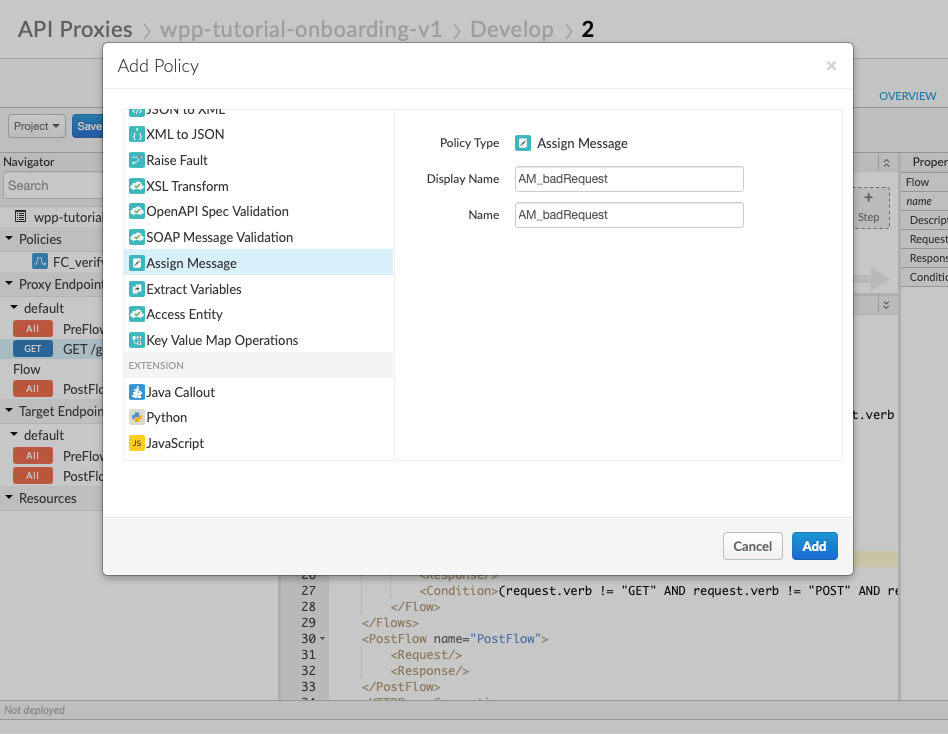
Create a new Assign Message policy and name it AM_badRequest (the same convention you used in creating a shared flow callout).
-
In the policy code editor, replace the default policy code with the following and select Save.
<?xml version="1.0" encoding="UTF-8" standalone="yes"?>
<AssignMessage async="false" continueOnError="false" enabled="true" name="AM_badRequest">
  <DisplayName>AM_badRequest</DisplayName>
  <FaultRules/>
  <Properties/>
  <Set>
      <Payload contentType="application/json">
          {
              "Errors": [{
                  "errorCode": '400',
                  "errorMessage": "Bad Request"
              }]
          }
      </Payload>
      <StatusCode>400</StatusCode>
      <ReasonPhrase>Bad Request</ReasonPhrase>
  </Set>
  <IgnoreUnresolvedVariables>true</IgnoreUnresolvedVariables>
  <AssignTo type="response" transport="http" createNew="true"/>
</AssignMessage> -
In the proxy code editor, under PreFlow, add the following to
Flows:<Flow name="Other">
<Description>Other</Description>
<Request>
<Step>
<FaultRules/>
<Name>AM_badRequest</Name>
</Step>
</Request>
<Response>
</Response>
<!--Update the condition to fit your needs-->
<Condition>(request.verb != "GET")</Condition>
</Flow>
Add a policy to include CORS
You will create a policy that adds CORS headers to each API request and implement a conditional flow to enforce it.
-
Create a new Assign Message policy and name it AM_addCORS.

-
In the policy code editor, replace the default policy code with the following.
<?xml version="1.0" encoding="UTF-8" standalone="yes"?>
<AssignMessage async="false" continueOnError="false" enabled="true" name="AM_addCORS">
  <DisplayName>AM_addCORS</DisplayName>
  <FaultRules/>
  <Properties/>
  <Set>
      <Headers>
          <Header name="Access-Control-Allow-Origin">*</Header>
          <Header name="Access-Control-Allow-Headers">*</Header>
          <Header name="Access-Control-Max-Age">3628800</Header>
          <Header name="Access-Control-Allow-Methods">GET, PUT, POST, DELETE</Header>
      </Headers>
  </Set>
  <IgnoreUnresolvedVariables>true</IgnoreUnresolvedVariables>
  <AssignTo type="response" transport="http" createNew="false"/>
</AssignMessage> -
In the proxy code editor, under PreFlow, add the following to
Flows:<Flow name="OPTIONS">
<Description>OPTIONS</Description>
<Request/>
<Response>
<Step>
<FaultRules/>
<Name>AM_addCORS</Name>
</Step>
</Response>
<Condition>request.verb == "OPTIONS"</Condition>
</Flow>
Next step: Prepare proxy docs
At this stage, you can continue configuring your API proxy as needed. But the next step in our tutorial is to prepare the necessary API proxy docs for deployment to production.
If, at any point, you want to look through the sample API proxy that we've been configuring, you can find it in the WPP Google Apigee.