Policies
API development utilizes policies as easily deployable components for building the API framework. These pre-configured components
are customizable to meet specific requirements. When default components are insufficient, extension policies like Python or
JavaScript can enhance the API. Apigee provides around 40 policies grouped into four categories. This document highlights
the policies we consider most crucial:
- Security policies
- Traffic management policies
- Mediation policies
- Extension policies
-
When creating an API, avoid starting here. Instead, initiate the process by utilizing shared flows as detailed in Quick API setup. This overview explains the policies used in the shared flows and can also assist when a more customized solution is needed for your API.
-
When naming policies, we try to be as descriptive as possible and use lowerCamelCase. For instance, we name the Verify API Key policy as "verifyAPIKey" and the Spike Arrest policy as "spikeArrest."
Security policies
Verify API key policy
The Verify API Key policy authenticates the provided API key, verifying if the calling application is registered with the requested API. Upon creating a developer application, an API key, known as the "Consumer Key" or "Application Key" in Apigee, is generated. To enhance security, the API key is placed in a header rather than a query parameter, as headers are not visible in the browser (although they can be accessed using developer tools).
As a best practice, it is recommended to remove the API key after authentication and before forwarding the request to the backend. This prevents the backend from receiving the API key, and the removal process can be executed using the Assign Message policy.
<?xml version="1.0" encoding="UTF-8" standalone="yes"?>
<VerifyAPIKey async="false" continueOnError="false" enabled="false" name="VAK_APIkeyValidation">
    <DisplayName>API-key-validation</DisplayName>
    <Properties/>
    <APIKey ref="request.header.apikey"/>
</VerifyAPIKey>
APIKey ref––we chose to name the header where we put the API key ‘apikey’, so the reference should match this name.
If the API key is invalid, an error is thrown, causing the API execution to halt. A default error is generated, indicating a status code of 401 Unauthorized.
{
    "fault": {
        "faultstring": "Failed to resolve API Key variable request.header.apikey",
        "detail": {
            "errorcode": "oauth.v2.InvalidApiKey"
        }
    }
}
Client credential grant type policy
The OAuth 2.0 client credentials grant flow enables a client to authenticate itself using its own credentials when interacting with the resource server. Once you have developed the application and API products, and you are prepared for developer registration, you must generate a client ID and a client secret during the application registration process. These client credential keys uniquely identify the client app in Apigee. There are two methods available for using client credentials in Apigee.
- Use Apigee as authorization server
- Use external IDP
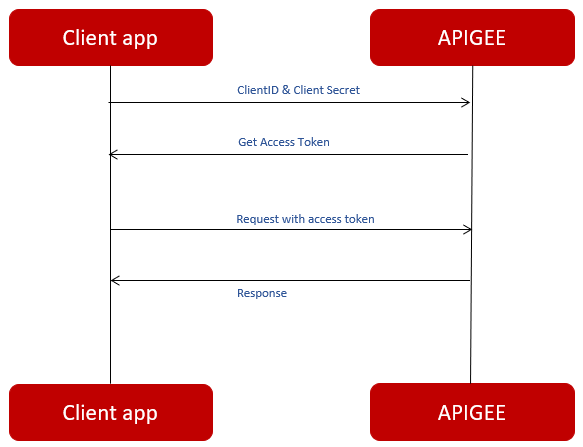
Use Apigee as authorization server
All client apps must be registered with Apigee. Upon app registration with Apigee, two keys are assigned:
- Client ID
- Client Secret
These client credential keys allow Apigee to uniquely identify the client app.
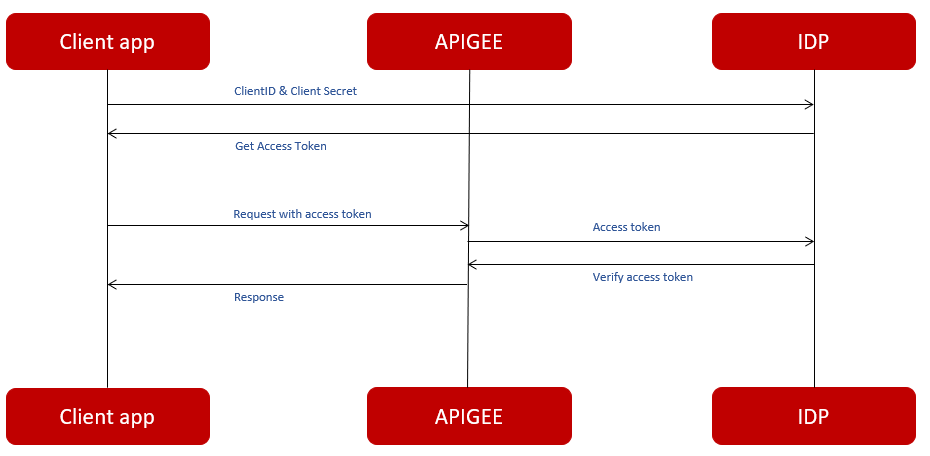
Use external IDP
The external IDP Gets Client ID and Client Secret from the client app request, processes it and generates an access token. With the generated access token, Apigee can authorize every request through sending the token to IDP to validate it.
For instance, if you are implementing the client credential grant type, you need to use multiple distinct OAuthV2 policies to execute the necessary actions. Following are the policies required for implementing the client credential grant type:
Access token generate policy
<?xml version="1.0" encoding="UTF-8" standalone="yes"?>
<OAuthV2 async="false" continueOnError="false" enabled="true" name="GenerateAccessTokenClient">
    <DisplayName>GenerateAccessToken</DisplayName>
    <FaultRules/>
    <Properties/>
    <Attributes/>
    <EnforceStrictCallbackURI>false</EnforceStrictCallbackURI>
    <ExpiresIn>14400000</ExpiresIn>
    <ExternalAuthorization>false</ExternalAuthorization>
    <GrantType>request.header.grant_type</GrantType>
    <Operation>GenerateAccessToken</Operation>
    <RefreshTokenExpiresIn>86400000</RefreshTokenExpiresIn>
    <GenerateResponse enabled="true">
        <Format>FORM_PARAM</Format>
    </GenerateResponse>
    <ReuseRefreshToken>false</ReuseRefreshToken>
    <SupportedGrantTypes>
        <GrantType>client_credentials</GrantType>
    </SupportedGrantTypes>
    <Tokens/>
</OAuthV2>
Verify access token
<?xml version="1.0" encoding="UTF-8" standalone="yes"?>
<OAuthV2 async="false" continueOnError="false" enabled="true" name="OA_VerifyAccessToken">
    <DisplayName>OA_VerifyAccessToken</DisplayName>
    <Properties/>
    <Attributes/>
    <ExternalAuthorization>false</ExternalAuthorization>
    <Operation>VerifyAccessToken</Operation>
    <SupportedGrantTypes/>
    <GenerateResponse enabled="true"/>
    <Tokens/>
</OAuthV2>
Refresh access token policy
<?xml version="1.0" encoding="UTF-8" standalone="yes"?>
<OAuthV2 async="false" continueOnError="false" enabled="true" name="RefreshAccessToken">
    <DisplayName>RefreshAccessToken</DisplayName>
    <FaultRules/>
    <Properties/>
    <Attributes/>
    <EnforceStrictCallbackURI>false</EnforceStrictCallbackURI>
    <ExpiresIn>1800000</ExpiresIn>
    <ExternalAuthorization>false</ExternalAuthorization>
    <GrantType>request.header.grant_type</GrantType>
    <Operation>RefreshAccessToken</Operation>
    <RefreshTokenExpiresIn>28800000</RefreshTokenExpiresIn>
    <GenerateResponse enabled="true">
        <Format>FORM_PARAM</Format>
    </GenerateResponse>
    <ReuseRefreshToken>false</ReuseRefreshToken>
    <SupportedGrantTypes/>
    <Tokens/>
</OAuthV2>
-
AccessTokenPrefix––VerifyAccessToken expects the access token to be sent in an Authorization header as a Bearer token.
-
GenerateResponse––if set to true, the policy generates and returns a response.
-
Operation––operation is the key configuration parameter for OAuth policy instances.
-
Refresh access token––a refresh token should not be immediately included if the access token request is valid and authorized.
Traffic management policies
The spike arrest is designed to throttle requests to the backend to prevent overloading. The rate can be configured as per second (ps) or per minute (pm). Consequently, the policy flattens the number of allowed calls. For instance, 60pm is flattened to 1 every second (60/60), and 500ps is flattened to 1 every 2 milliseconds (1000/500).
The spike arrest counter is not automatically maintained across message processors. Therefore, if your configuration involves 2 message processors, the total load on the backend becomes 2 times the specified rate. To prevent this, ensure to set the UseEffectiveCount parameter to true.
Spike arrest
<?xml version="1.0" encoding="UTF-8" standalone="yes"?>
<SpikeArrest async="false" continueOnError="false" enabled="true" name="SA_spikeArrest">
    <DisplayName> spikeArrest </DisplayName>
    <Properties/>
    <Rate>500ps</Rate>
    <UseEffectiveCount>true</UseEffectiveCount>
</SpikeArrest>
Rate––number of calls that the Back End can receive in a period of time. The time periods that are allowed are pm (per minute) and ps (per second).
Quota
The quota policy serves to permit a specific number of requests within a designated time frame (minute, hour, day, week, month). Upon reaching this limit, the API responds with an error. Typically, this limit is established at the product level and can be configured under the 'Quota' setting within the product. However, merely defining these properties is insufficient. To actively enforce the quota on an API, it is necessary to create a quota policy that references the aforementioned attributes. The following is an example of a quota policy utilizing the quota attributes configured at the product level.
<?xml version="1.0" encoding="UTF-8" standalone="yes"?>
<Quota async="false" continueOnError="false" enabled="true" name="Q_impose-Quota">
    <DisplayName>imposeQuota</DisplayName>
    <Allow countRef="verifyapikey.verifyApiKey.apiproduct.developer.quota.limit" count="2000"/>
    <Interval ref="verifyapikey.verifyApiKey.apiproduct.developer.quota.interval">1</Interval>
    <Distributed>true</Distributed>
    <Synchronous>true</Synchronous>
    <TimeUnit ref="verifyapikey.verifyApiKey.apiproduct.developer.quota.timeunit">month</TimeUnit>
</Quota>
Allow CountRef––this element establishes the quota count limit. In this scenario, both a count and a countRef are specified. The countRef points to a variable or attribute set at runtime during the execution of the verifyApiKey policy, specifically referring to the quota set on the product. Apigee will initially attempt to resolve the countRef variable. If, for any reason, the variable cannot be resolved, the system will fallback to the count specified explicitly.
Interval––this element references the interval, aligning with the interval set on the product. Its functionality mirrors that of the Allow countRef element. In instances where the variable cannot be resolved, the default value of 1 is used.
TimeUnit––here the time unit is defined. It works in the same way as the elements mentioned earlier.
If there is no reference to a product, the limit remains consistent for all applications invoking the API. Typically attached to the Proxy Endpoint Preflow, the quota set for a specific duration is not evenly distributed over time. For example, if a product allows 2000 calls per month, all these calls could be made on the first day. Consequently, no further calls would be feasible for the remainder of the month until the counter resets at the start of the new month.
Quota is not shared across APIs. Instead, the quota defined on the product is applied individually to each API linked to that product . For instance, if a product permits 2000 calls per month, every API associated with that specific product is independently allowed 2000 calls per month.
Cache
Caching is a valuable tool for significantly improving API response times by reducing backend requests. Typically applied to GET calls fetching information, caching stores responses for subsequent requests until the cache expires. This approach effectively minimizes trips to the backend when the same information is requested again within the cache duration.
While caching is most commonly associated with GET calls, there are specific cases, particularly in SOAP services, where caching for POST calls may be beneficial. In such instances, where POST calls request information rather than caching an object, consideration may be given to caching the data. However, caution is advised, as caching highly dynamic data could potentially result in returning outdated information to the client.
It is considered best practice to implement caching at the API layer rather than the backend. Caching information higher up in the chain leads to shorter response times. Additionally, centralizing caching at the API layer simplifies the debugging process, as dealing with caches at various points in the chain can make troubleshooting more complex.
Response cache policy
The response cache policy is the most commonly utilized caching policy. It is essential to attach the same policy to both the request and response flows. When the cache is successfully hit, the flow segment between these two policies is bypassed. Consequently, the request does not proceed to the backend; rather, the API retrieves its response directly from the cache. This behavior is evident in the trace, where the response flow initiates after the execution of the initial response cache policy.
<?xml version="1.0" encoding="UTF-8" standalone="yes"?>
<ResponseCache async="false" continueOnError="false" enabled="true" name="RC_responseCache">
    <DisplayName>responseCache</DisplayName>
    <Properties/>
    <CacheKey>
        <Prefix/>
        <KeyFragment ref="request.uri" type="string"/>
    </CacheKey>
    <Scope>Exclusive</Scope>
    <ExpirySettings>
        <ExpiryDate/>
        <TimeOfDay/>
        <TimeoutInSec ref="">3600</TimeoutInSec>
    </ExpirySettings>
    <ExcludeErrorResponse>true</ExcludeErrorResponse>
    <SkipCacheLookup>request.header.bypass-cache = "true"</SkipCacheLookup>
    <SkipCachePopulation></SkipCachePopulation>
    <UseAcceptHeader>false</UseAcceptHeader>
    <UseResponseCacheHeaders>false</UseResponseCacheHeaders>
</ResponseCache>
KeyFragment––the data is stored in the cache as the value associated with a cache key. The KeyFragment element defines which key is employed to store a particular piece of information. Typically, query parameters, URI, or headers are utilized to construct a KeyFragment. Simultaneously, this KeyFragment is instrumental in retrieving the accurate piece of information corresponding to a specific cache key.
Scope––scope can take on various values and is employed for namespacing purposes. The designated value is prefixed to the KeyFragment, forming a highly distinct pointer as a cache key. In this instance, the scope is specified as 'Exclusive'. Depending on where the policy is attached within the API, the scope might represent, for example, 'ApiProxyName_TargetName'. It's important to note that this element has the capability to overwrite the scope.
TimeoutInSec––specifies the number of seconds until the cache expires.
ExcludeErrorResponse––doesn't cache target responses with HTTP error status codes; only responses with status codes from 200 to 205 will be cached.
SkipCacheLookup––if expression evaluates to true at runtime, specifies that cache lookup should be skipped and the cache should be refreshed.
Mediation policies
Raise fault
The Raise Fault policy enables the triggering of an error when the specified condition evaluates to true. This policy diverts the flow from the normal pathway to the error flow. Within the Raise Fault policy configuration, it is possible to customize elements such as the status code, payload, and reason phrase. An example use case involves triggering an error when a POST request is sent to the API, but only GET requests are supported.
This policy practically always goes hand in hand with a condition. When no condition is set, the Raise Fault always triggers the error flow when an API call comes in and returns an error.
Body	<?xml version="1.0" encoding="UTF-8" standalone="yes"?>
<RaiseFault async="false" continueOnError="false" enabled="true" name="RF_raiseFaultGET">
    <DisplayName>raiseFaultGET</DisplayName>
    <Properties/>
    <FaultResponse>
        <Set>
            <Payload contentType="application/json" variablePrefix="@" variableSuffix="#">{"Error":"Only 'GET' requests allowed"}</Payload>
            <StatusCode>400</StatusCode>
            <ReasonPhrase>Bad Request</ReasonPhrase>
        </Set>
    </FaultResponse>
    <IgnoreUnresolvedVariables>true</IgnoreUnresolvedVariables>
</RaiseFault>
Set––defines the payload, status code and reason phrase that are returned when the condition on this policy evaluates to true. In this case, when the request is not a GET request. It is possible to create payloads in different formats, here we chose to return a JSON message.
Extract variables
The Extract Variables policy is primarily employed to capture variables from a payload, offering valuable functionality for capturing variables in the ProxyEndpoint preflow for later use in the API. Unlike some standard Apigee variables, which are limited to certain flows (e.g., request headers and query parameters scoped to the request part of the transaction), custom variables created with this policy are available throughout the entire lifecycle—from the moment they are set at runtime to the conclusion of the last executed flow.
For instance, this is how to extract a query parameter:
<?xml version="1.0" encoding="UTF-8" standalone="yes"?>
<ExtractVariables async="false" continueOnError="false" enabled="true" name="EV_extractCountry">
    <DisplayName>extractCountry</DisplayName>
    <Properties/>
    <QueryParam name="country">
        <Pattern ignoreCase="true">{_country}</Pattern>
    </QueryParam>
</ExtractVariables>
QueryParamName––the name of the query parameter the value needs to be extracted from.
Pattern––the variable name the value needs to be written to.
Variables can also be extracted in JavaScript. We usually do this when we need to make some further transformations / calculations.
Assign message
Following the extraction of variables using the Extract Variables or JavaScript policy, the Assign Message policy becomes useful in crafting a new request or response by utilizing these variables. This policy allows for actions such as copying, setting, deleting, or adding elements. Here are some examples illustrating modifications to the request object:
Removing headers
<?xml version="1.0" encoding="UTF-8" standalone="yes"?>
<AssignMessage async="false" continueOnError="false" enabled="true" name="AM_removeHeaders">
    <DisplayName>removeHeaders</DisplayName>
    <Remove>
        <Headers>
            <Header name="apikey"/>
            <Header name="Authorization"/>
        </Headers>
    </Remove>
    <IgnoreUnresolvedVariables>true</IgnoreUnresolvedVariables>
    <AssignTo createNew="false" transport="http" type="request"/>
</AssignMessage>
Remove––The Remove Element within the Assign Message policy is employed to eliminate specific headers from the request, as specified in the Headers element. In this instance, the policy removes the apikey, Authorization, client, and label headers from the request. This action prevents these headers from being sent to the backend.
Assigning headers
<?xml version="1.0" encoding="UTF-8" standalone="yes"?>
<AssignMessage async="false" continueOnError="false" enabled="true" name="AM_assignHeaders">
    <DisplayName>assignHeaders</DisplayName>
    <Properties/>
    <Add>
        <Headers>
            <Header name="id">{messageid}</Header>
        </Headers>
    </Add>
    <Set>
        <Headers>
            <Header name="customerId">{verifyapikey.verifyApiKey.customerId}</Header>
        </Headers>
    </Set>
    <IgnoreUnresolvedVariables>true</IgnoreUnresolvedVariables>
    <AssignTo createNew="false" transport="http" type="request"/>
</AssignMessage>
Add––adds a header from the request specified in the Headers element. In this case the policy adds a header called “id” with the value from the variable called “messageid”.
Set––sets or overwrites the “customerId” header with the value from the variables “verifyapikey.verifyApiKey.customerId”
The “Add” element adds something to the request. When a header already exists, the value is added behind the already existing value. The “Set” element sets of overwrites something in the request. It can overwrite an already existing header.
Extension policies
JavaScript
The JavaScript policy facilitates the integration of JavaScript within the API. The policy references a .js script that is executed within the context of the API flow.
The JavaScript object model, detailed in the JavaScript Object Model documentation, provides guidance on setting and retrieving variables from the API using JavaScript. This policy offers versatile applications, commonly employed for variable transformations (e.g., calculations, string transformations) or JSON payload validation. Here is an example:
JavaScript
<?xml version="1.0" encoding="UTF-8" standalone="yes"?>
<Javascript async="false" continueOnError="false" enabled="true" timeLimit="200" name="setMessageLogging">
    <DisplayName>setMessageLogging</DisplayName>
    <ResourceURL>jsc://setMessageLogging.js</ResourceURL>
</Javascript>
ResourceURL––the reference to the file that contains the JavaScript (script).
Example javascript resource
var isoDate = context.getVariable("system.timestamp");
context.setVariable("_lastPolicy", isoDate);
context.getVariable––a way to retrieve variables at runtime.
context.SetVariable––a way to set variables at runtime. In this example, a timestamp is set as the variable “_lastPolicy”.