Introduction to API cookbook
Welcome to the API Cookbook!
Think of the cookbook as a recipe book for creating your APIs on the Apigee API management platform. We'll share the best practices to build an API, explain how APIs work, and give you everything you need to make a safe and secure API on Apigee. Plus, we'll sprinkle in some code examples that can help you during implementation.
Two additional documents that guide your API development:
- The Data Dictionary (DD): This document tells you what resources your APIs expose and their paths.
- The API Conventions (AC): This document outlines how WPP implements its architecture, naming conventions, verbs, error codes, and more.
Understanding execution of APIs
As you can see in the figure below, the client or consumer communicates with the API over the public internet, known as the Request. The API subsequently interacts with the backend. The response from the backend travels back through the API to reach the consumer, referred to as the Response.
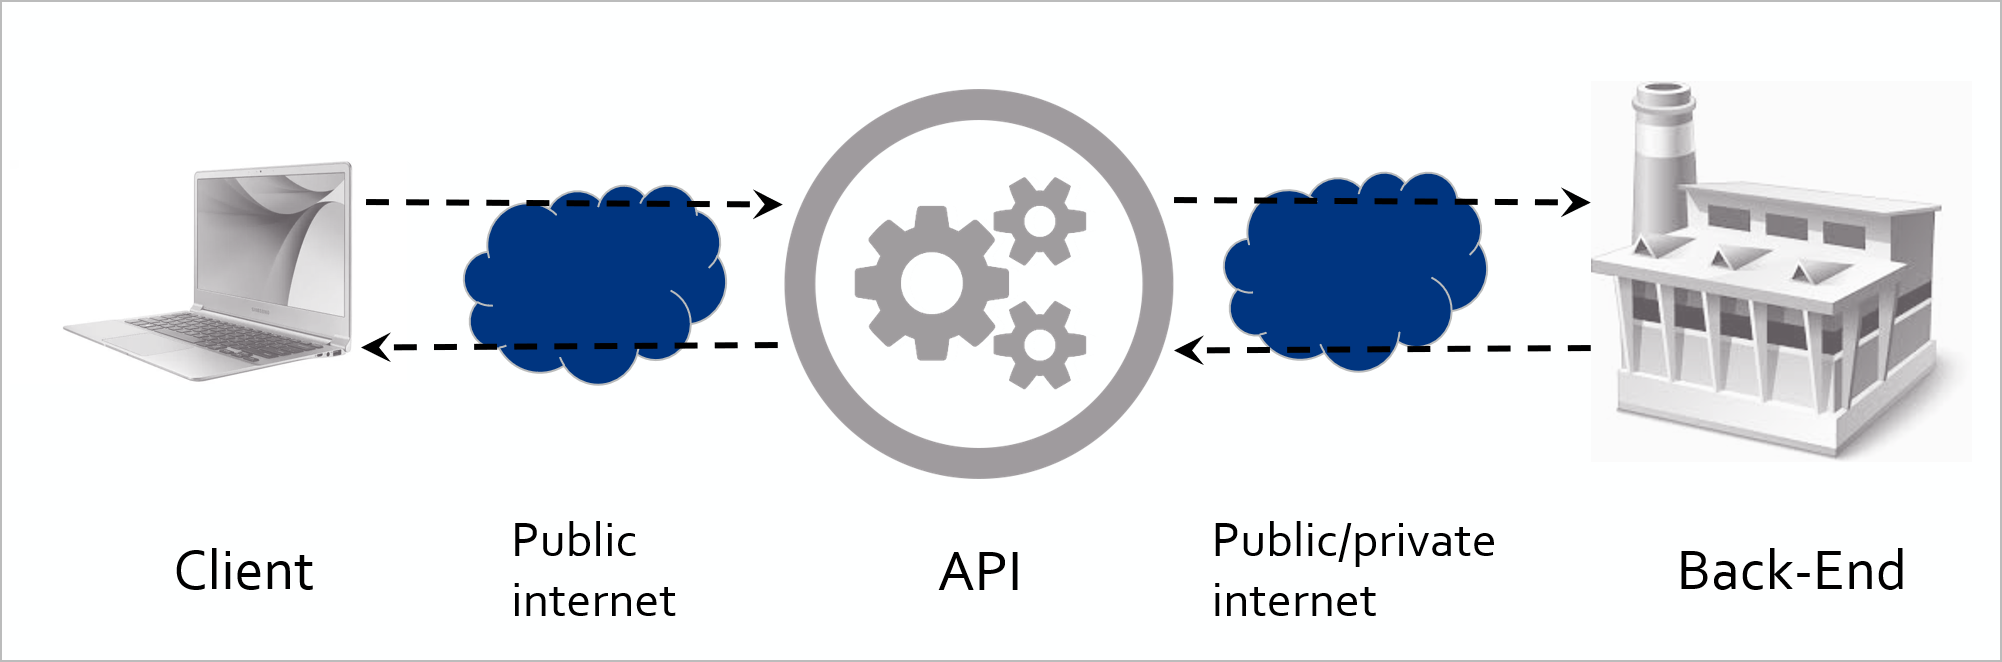
Figure 1: Structure of API request and response
If you take a closer look at the API, you can distinguish four quadrants, as illustrated in the Figure 2: Quadrants in Apigee. In the API world, think of each quadrant as having its own unique job. In Apigee's documentation, Google names two of these tasks: ProxyEndpoint and TargetEndpoint. In our model, Quadrants A and D correspond to ProxyEndpoint, while B and C map to TargetEndpoint.

Figure 2: Quadrants in Apigee
(A) Proxy Request quadrant
In this quadrant, you have three main tasks:
- Check if the user is allowed to use the API (by validating the api key or access token).
- Ensure you don't overload the backend server with too much traffic.
- Check if the user's request is safe, without any harmful stuff like weird code or too much data like SQL injection or size overloading (Regular Expression, XML Threat and JSON Threat).
Policies you would put here are:
| Policy category | Policy |
|---|---|
| Security | Verify API Key |
| JSON Threat Protection | |
| XML Threat protection | |
| Regular Expression Protection | |
| Mediation | Extract Variables |
| Raise Fault | |
| Traffic Management | Spike Arrest |
| Quota |
Only approved API requests that are safe for the backend are allowed to proceed to the next stage, while any other requests are turned away.
(B) Target request quadrant
The main purpose of this quadrant is to construct a fresh and well-organized request destined for the backend, formatted precisely as required. A primary concern in this phase is to ensure that no sensitive data from the consumer is inadvertently shared with the backend. For instance, information like the client's API key is unnecessary for the backend. It's considered a best practice to review and sanitize the request headers, including only those essential for the backend's request.
Optimize performance through data caching
In specific situations, multiple consumers may request identical non-volatile data, providing an opportunity for data caching within the API. This involves storing a call's response in a cache, allowing retrieval when the same data is requested again. This efficient process eliminates the necessity for a complete roundtrip to the backend, leading to a more streamlined and responsive system. For in-depth information on caching, see the Cache section.
Typical policies you would put here are:
| Policy category | Policy |
|---|---|
| Mediation | Extract Variables |
| JSON to XML | |
| XML to JSON | |
| Assign Message | |
| Traffic Management | Invalidate Cache |
| Populate Cache | |
| Lookup Cache | |
| Extension | Service Callout |
(C) Target response quadrant
In this quadrant, you focus on the response that arrives from the backend. This phase is crucial for refining the response before it reaches the client.
Validate payloads
One of our tasks here is to verify the payload you receive. For example, if the backend sends an "error" response that surprisingly comes with a "200 OK" status code and a fault message, you can handle it appropriately. However, it's generally expected that such error handling should be managed by the backend itself.
Cleanup header
Another task is to clean up the headers that come back from the backend. These headers may contain sensitive information like server details or passwords, which you wouldn't want to pass on to the client. To safeguard this, you use policies to remove or modify the headers as needed.
Considerations for applying policies
It's important to note that certain policies can be applied in either this quadrant or the Proxy Response Quadrant. For instance, if you need to convert the response format from XML to JSON, it can be done in either place. The choice depends on your specific requirements and preferences.
Typical policies you would put here are:
| Policy category | Policy |
|---|---|
| Security (if you don’t trust the backend) | JSON Threat Protection |
| XML Threat Protection | |
| Regular Expression Protection | |
| Mediation | Extract Variables |
| JSON to XML | |
| XML to JSON | |
| Assign Message | |
| Raise Fault |
(D) Proxy response quadrant
Configure policies for response enhancement
As previously mentioned in the Target Response Quadrant, you have the capability to set up policies that can alter the format or content of the response sent to the client. Additionally, you can remove specific headers from the response originating from the backend.
Message logging considerations
Message logging is a feasible option within this flow. However, it's worth noting that the PostClientFlow is generally the preferred choice for this purpose. The PostClientFlow not only serves the same function but also offers enhanced performance, making it the more efficient option for message logging.
| Policy category | Policy |
|---|---|
| Mediation | Extract Variables |
| JSON to XML | |
| XML to JSON | |
| Assign Message | |
| Extensions | Message Logging |
Apigee flows
When looking at the flows, you can divide every quadrant into a pre and post-flow. The preflow always executes first, followed by the postflow. Figure 3 depicts the structure of the concept.
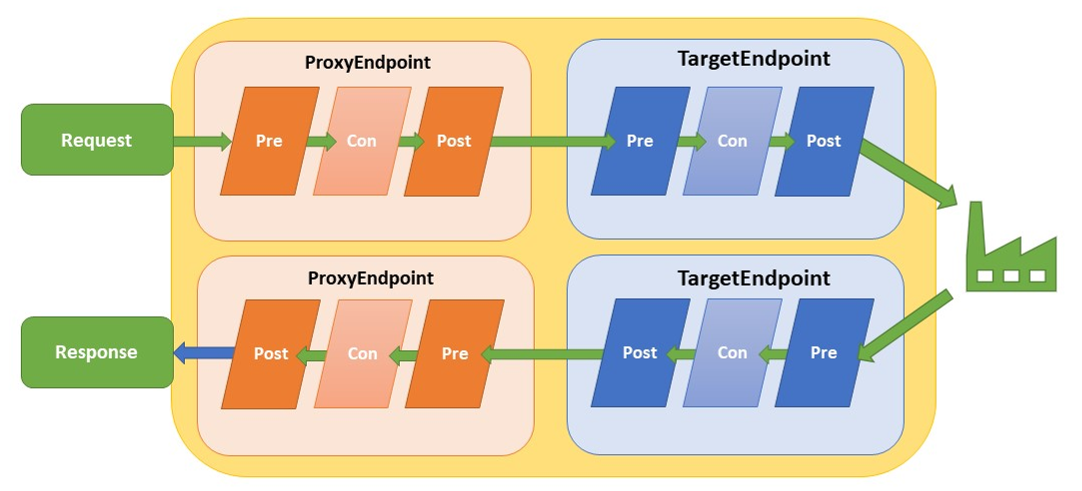
Figure 3: Flows in Apigee
Conditional flows
In addition to the standard flows, you have the flexibility to include conditional flows in your API setup. These conditional flows can be inserted between every preflow and postflow within both the proxyEndpoint and targetEndpoint. Conditional flows, as the name suggests, only run when their specific conditions are met. You can even have multiple conditional flows, each with its unique set of conditions.
However, if you don't specify any conditions for a flow, it will always execute, and any subsequent flows won't even be evaluated. In other words, the absence of a condition means the flow will run unconditionally.
Only one conditional flow between the preflow and postflow gets executed. The evaluation of flows occurs from the top to the bottom. The first flow with a true condition encountered during this evaluation is the one that gets executed.
Example: When the condition of the “/products” flow equals to false and the “/prices” flow equals to true (the uri path is “/prices” and the request specifies the GET method), the /prices flow will be executed (Figure 4).
Create a conditional flow for every method and resource combination and place the logic that specifically applies to that method in the corresponding flow. This will keep your API organized.
Shared facilitatinglows
A shared flow is a flow that can be used in all APIs throughout an environment in your organization. When you intent to re-use certain functionality in your APIs, you can build a shared flow with the policies on it you want to use. In the API you can use the Flow Callout policy that points to a specific shared flow. When the policy executes it automatically executes all the policies attached to the shared flow.
In the WPP environment, the flows that are supposed to be used in every API are:
Shared_preFlow-v1
This flow is placed on the Proxy Endpoint Preflow (request). It contains policies for security, OPTIONS calls and logging.
| Policy category | Policy |
|---|---|
| raiseFaultCORS | raiseFaultCORS Returns the CORS headers for OPTIONS calls (Raise Fault) |
| spikeArrest | XML to JSON |
| verifyApiKey | Assign Message |
| imposeQuota | Invalidate Cache |
| removeApikeyHeader | Populate Cache |
Shared_faultRule-v1
This flow is placed on the Proxy Endpoint FaultRules. This flow contains policies that reformats the Apigee default error response.
| Policy category | Policy |
|---|---|
| ExtractErrorMessage | Extract the error message |
| setErrorBody | Formatting of the error’s response object. |
Shared_ValidateOktaToken-v1
This flow is placed on the Proxy Endpoint Preflow (request). It contains policies that verify the incoming JWT token based on Okta configuration.
| Policy category | Policy |
|---|---|
| KVM-getOktaConfig | Retrieve the Okta config from the KVM |
| RF-missingAuthorization | Throw an error if the Authorization header is empty. |
| LC-cacheLookupOktaKeys | Lookup the Okta JWKS in the cache |
| SC-retrieveOktaKeys | Retrieve the Okta JWKS from the keys endpoint |
| PC-cacheInsertOktaKeys | Insert the Okta JWKS in the cache |
| AM-assignMessageOktaKeys | Align the cache and the callout keys to the same variable |
| EV-extractJWT | Extract the JWT from the Authorization header |
| VJ-verifyJWTOkta | Verify the JWT based on the JWKS |
| RF-raiseFaultMalformedJWT | Raise specific error for malformed JWT. Apigee does not throw a human-readable error in this instance |
| RF-raiseFaultJWT | Raise the Apigee JWT error |
For more information on how to configure these flows in an API, please take a look at the Quickstart.
Creating a shared flow
To create a shared flow, follow these steps:
- Navigate to the DEVELOP section.
- Select Shared Flows.
- Click the + Shared Flow button located in the upper right corner.
After creating the shared flow, remember to deploy it. It's essential to ensure that both the shared flow and the API referencing the shared flow are deployed within the same organization and environment for seamless integration and functionality.
There are three types of shared flows, each with specific naming conventions:
Shared Flows for Flowhooks
Naming Convention: FlowHook_(flowhook-target)_(version)
Examples:
- FlowHook_PreProxy-v1
- FlowHook_PreTarget-v1
- FlowHook_PostProxy-v1
- FlowHook_PostTarget-v1
Shared Flows for a Single Backend
Naming Convention: (BackendName)_(purpose/flow)-(version)
Examples:
- Azure_authorizationHeaders-v1
- Tibco_preFlow-v1
Shared Flows Usable for Multiple Backends
Naming Convention: Shared_(purpose/flow)-(version)
Examples:
- Shared_authorizationHeaders-v1
- Shared_preFlow-v1
These naming conventions help you quickly identify the type and purpose of each shared flow.
There are two essential flow hooks for WPP, namely FlowHook_PostProxy-v1 and FlowHook_PreTarget-v1.
FlowHook_PostProxy-v1
- This flow hook operates at the Proxy Endpoint Postflow stage.
- Its primary function is to manage and return the CORS headers, facilitating smooth communication.
FlowHook_PreTarget-v1
- This flow hook comes into play just before an API request is sent to the backend.
- Its role is to set the x-request-id header, an essential task for tracing and monitoring purposes.
In a nutshell, these flow hooks ensure efficient and traceable interactions within the WPP environment.
Special flows
In addition to the flows discussed earlier in this chapter, there are specific flows triggered by specific events. These special flows include:
Post-Client flow
This flow is executed after the response has been sent to the customer, specifically after the response
ProxyEndpoint postflow.
Its primary purpose is to facilitate the transfer of log files to a designated log system. Importantly,
this flow does not impact response times because it operates after the response is already delivered.
Currently, this flow exclusively accommodates the Message Logging policy.
Error flow (FaultRule / Default-Fault-Rule)
When the backend returns a non-success status code, a policy execution fails, or a fault is
generated via the "raise fault" policy, the API enters an error state.
In this state, the API deviates from the normal flow and transitions into the error flow.
For comprehensive information on error handling, please refer to the Error handling section.